Securing your website on an IIS Windows Server 2016 with an SSL/TLS certificate ensures that the communications transmitted between your server and site visitors are encrypted. Without it, cybercriminals can intercept, modify, and steal sensitive data in transit.
In this guide, we’ll cover both manual installation and the automated installation method (using CertPanel). The steps are written so clearly to make it easy for everyone (including novices) to follow along.
Prerequisite: If You Don’t Already Have One, You Must Get an SSL/TLS Certificate
Already have an SSL/TLS certificate ready to install? Then you can skip this part and move on to Step 1. But if you don’t, here’s what you must know.
In order to enable the SSL/TLS protocol on your website, you first must have an SSL/TLS certificate available to install on your server.
- This tiny digital file authenticates your server and provides the public-private key pair that’s used to initially communicate during the SSL/TLS handshake in insecure public channels.
- It’s what makes the secure padlock appear in certain browsers and eliminates the “this site is not secure” type messages.
Manual Method: How to Install an SSL Certificate on Windows Server 2016
Step 1: Generate a Certificate Signing Request (CSR)
Before you can obtain an SSL certificate, you need a certificate signing request (CSR). This is a special text file that contains details about your domain and organization.
Here’s how to generate one in IIS on Windows Server 2016:
- Open the Internet Information Services Manager (IIS Manager) from the Start menu.
- In the left-hand Connections panel, select your server name.
- In the middle panel, double-click Server Certificates.
- From the Actions panel on the right, click Create Certificate Request.
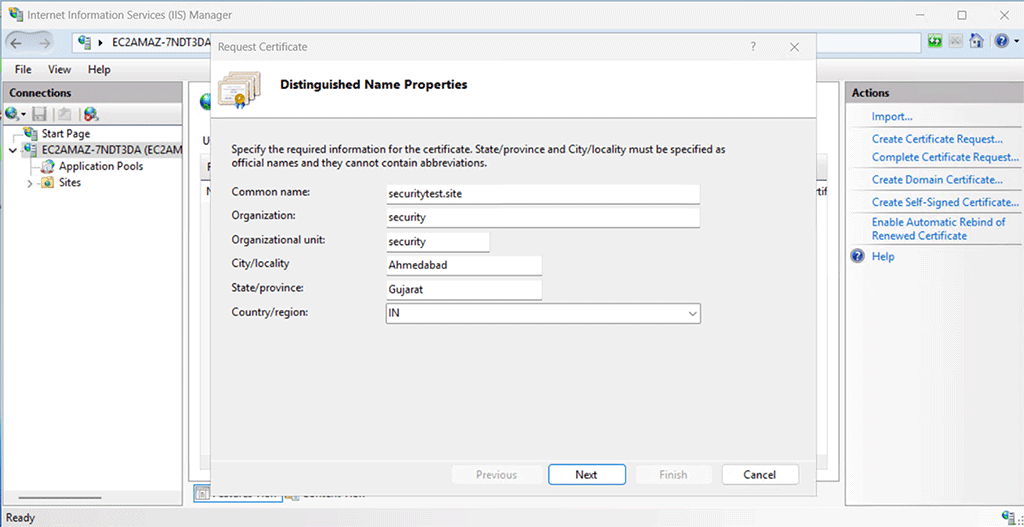
- A wizard will open. Enter the required details carefully (if you mistype any information, you must generate a new CSR).
- Common Name: Your domain name (e.g., securitytest.site). For a wildcard SSL, use an asterisk to denote the subdomain level you wish to secure (e.g., *.securitytest.site for first-level subdomains)
- Organization: Your company’s registered name
- Organizational Unit: Optional field (e.g., IT or Web Security)
- City/Locality: Your city
- State/Province: Full state name (no abbreviation)
- Country: Two-letter ISO code (e.g., IN for India, US for the United States)
- Choose your Cryptographic Provider (usually the default is fine) and set the key length to 2048-bit as a minimum for strong security.
- Save the CSR file to a secure location on your server (e.g., C:\certificates\securitytest.csr).
Step 2: Submit the CSR to Your Certificate Provider
Now that you have your CSR file, you need to submit it to the SSL provider from whom you purchased your certificate. (This is done through the CA’s website, typically by copy-pasting the CSR data in the certificate enrollment form or uploading the CSR file.)
If you’re using CertPanel, this process is streamlined, but for general readers:
- Log in to your SSL provider’s portal.
- Begin the SSL enrollment or certificate request process.
- Upload or paste the contents of your CSR file.
- Select the SSL type you purchased (e.g., a wildcard SSL certificate to cover all single-level subdomains).
Step 3: Complete the Domain Control Validation (DCV) Process
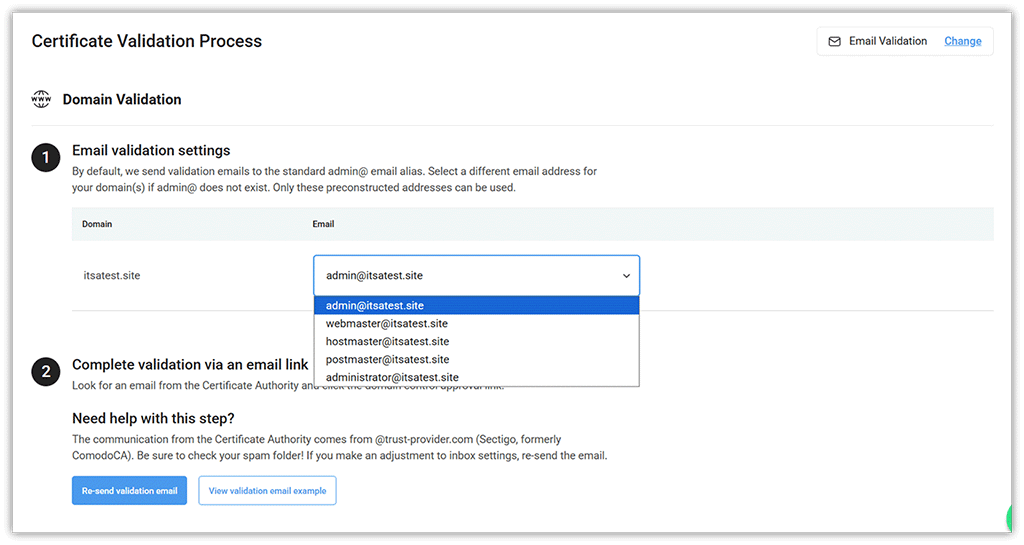
This step requires you to prove you’re in control of the domain for which the certificate is being issued. To complete the DCV process, you must select one of the following options:
- Email-based validation: This involves the certificate issuer sending a domain control approval link via email to one of the pre-constructed email addresses (e.g., emails that start with admin@, webmaster@, hostmaster@, postmaster@, or administrator@).
- HTTP validation (recommended): With this validation method, you upload the provided file to your server’s web root directory wherever your certificate provider instructs you to do so. For example, if you must upload the validation token to the directory .well-known/pki-validation/, then your file path may look something like this:
/var/www/html/.well-known/pki-validation/validation-token-string.txt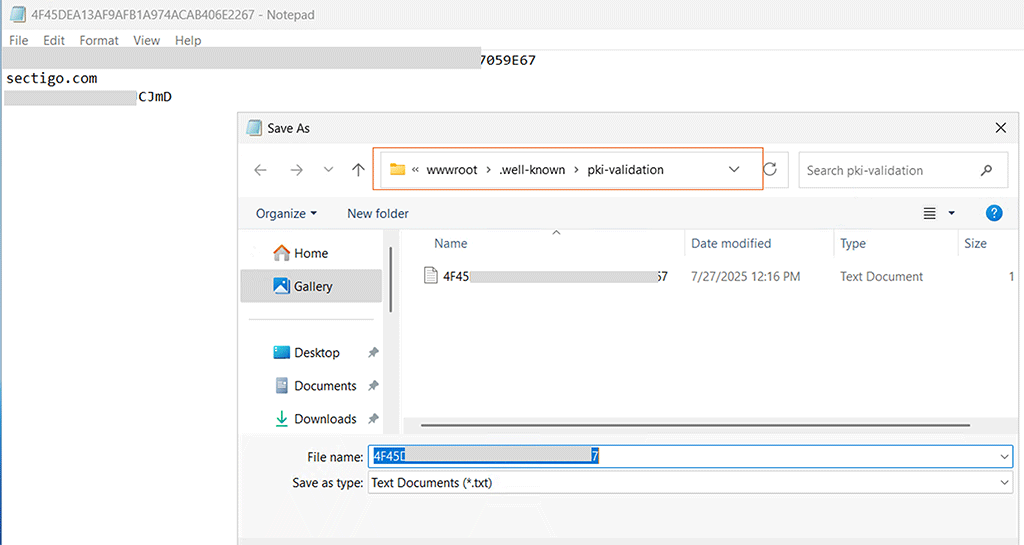
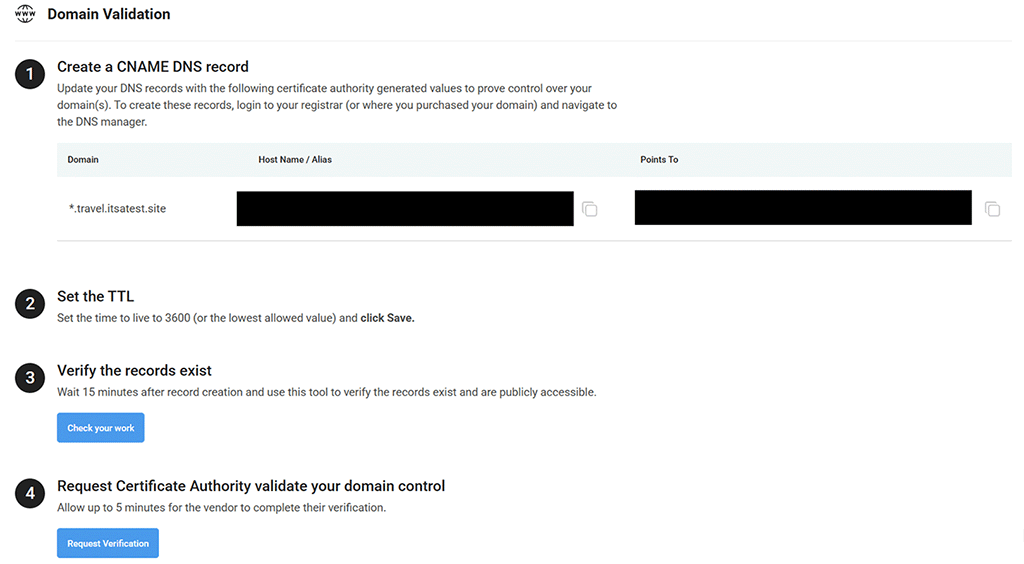
- CNAME DNS validation: Likewise, with this method, you add a new TXT record containing CA-provided token data to your domain’s DNS as instructed.
If you purchased your certificate through us and choose either the HTTP file-based or CNAME DNS-based validation method, then you’ll find the validation-related info in your CertPanel account.
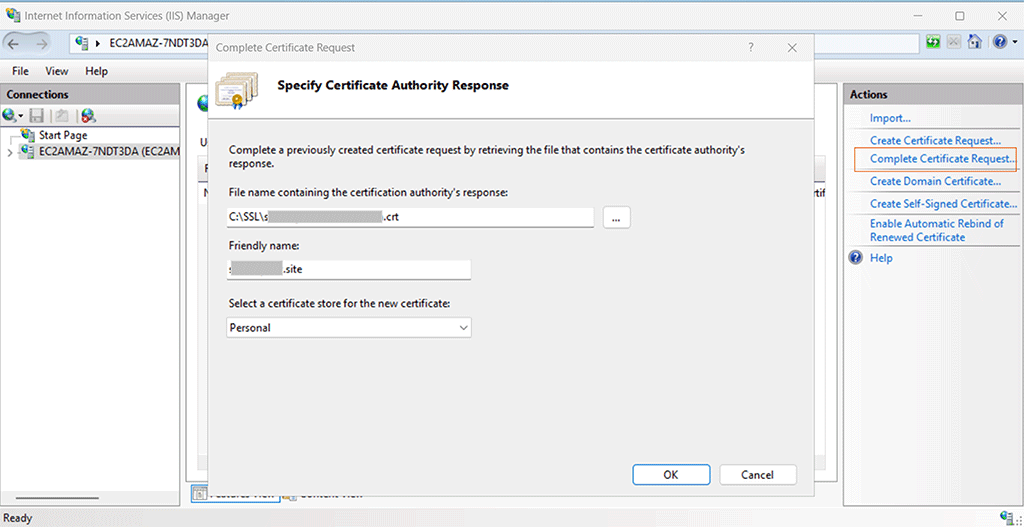
Step 4: Retrieve and Install Your SSL Certificate in IIS
After your domain is validated, your provider will issue the SSL/TLS certificate files. (These are typically downloadable from the provider’s website.) You’ll receive:
- certificate.crt — Your domain’s SSL/TLS certificate.
- ca_bundle.ca-bundle — The intermediate certificate chain file.
If you purchase your SSL/TLS certificate through us, you’ll be able to download your certificate from your CertPanel account dashboard.
Once you have downloaded your certificates, it’s time to put them on your server:
- Open IIS Manager again.
- Select your server name and open Server Certificates.
- In the Actions panel, click Complete Certificate Request.
- Browse to your certificate file (certificate.crt). (Note: The CA bundle file will be imported separately under step 6.)
- Enter a friendly name (e.g., “securitytest-site-ssl”) so you can identify it later.
- Click OK to complete the installation.
Step 5: Bind the SSL Certificate to Your Website
The certificate is now installed, but you must bind it to your website. This associates your certificate with your specific domain or IP address, port number, and other relevant details, and enables IIS to serve connections to the website using the secure HTTPS protocol.
- In IIS Manager, expand the Sites folder and select your domain (e.g., securitytest.site).
- In the Actions panel, click Bindings.
- In the Site Bindings window, click Add (or edit an existing HTTPS binding if one exists).
- Choose the following settings:
- Type: HTTPS
- IP Address: All unassigned (or select the correct IP if your server hosts multiple sites)
- Port: 443
- SSL Certificate: Select the certificate you just installed
- Click OK and close the dialog.

Step 6: Add the SSL Certificate to the Microsoft Management Console (Optional)
This step is optional but recommended for administrators who want better visibility and control. Adding the certificate to the Microsoft Management Console (MMC) makes it easier to view, organize, or back up certificates.
- Press Win + R, type mmc, and press Enter.
- In the console window, go to File > Add/Remove Snap-in.
- Select Certificates, click Add, then choose Computer Account > Local Computer.
- Expand Certificates (Local Computer) > Personal > Certificates to confirm your installed certificate is present.
- If your provider issued an intermediate CA bundle (ca_bundle.ca-bundle), you can import it by expanding Intermediate Certification Authorities > Certificates, right-clicking Certificates, and selecting All Tasks > Import. Complete the wizard to add the file.

✅ Why this helps: MMC centralizes certificate management, ensures the complete trust chain is installed, and makes it easier to diagnose SSL issues in the future.
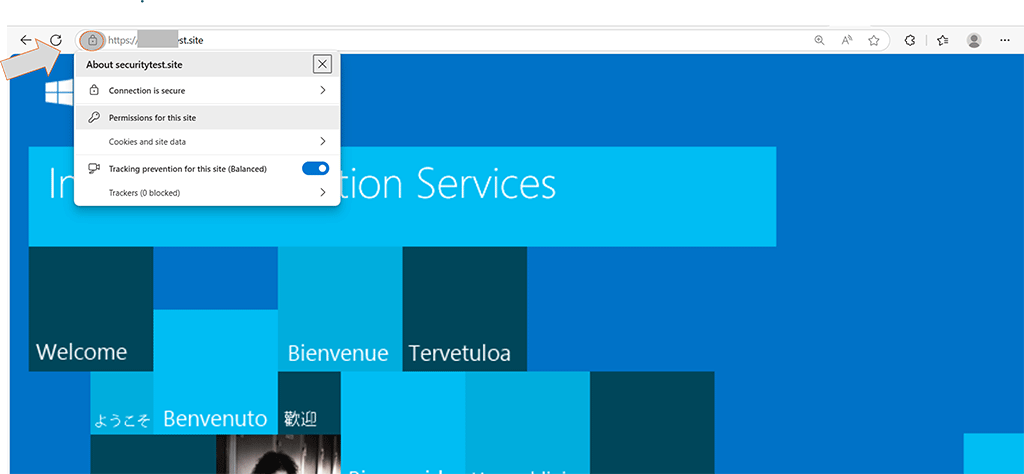
Step 7: Verify Your SSL Installation Was Successful
Finally, test that your SSL certificate is active and properly configured.
- Open a browser and visit the secure version of your site (i.e., ensure “https” is visible in the domain, like https://yourdomain.com).
- You should see the secure padlock icon in the address bar.
- Use an online SSL checker tool (e.g., SSL Checker Tool) to confirm that:
- The full certificate chain is installed.
- No errors are reported.
- Modern browsers trust your certificate.

Automatic Installation Using CertPanel AutoInstall Agent
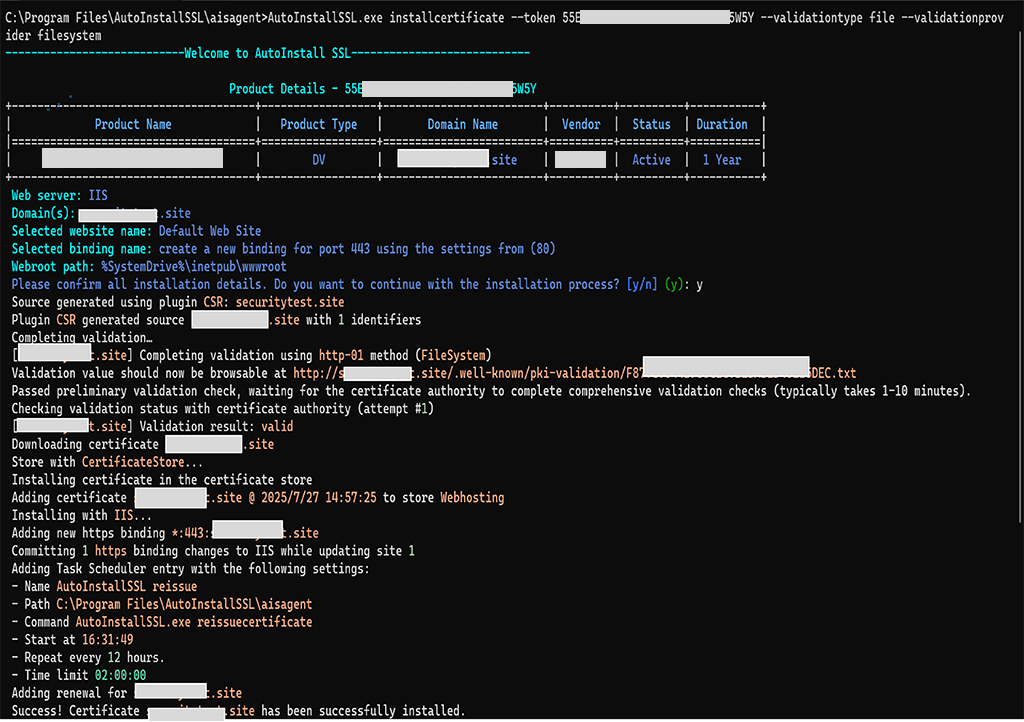
If you’d rather skip the manual CSR generation, certificate import, and IIS binding steps, CertPanel AutoInstall SSL provides a one-click automated solution. The AutoInstall Agent handles everything for you — certificate request, domain validation, installation, IIS binding, and renewals — so you don’t have to worry about redoing these steps every year.
Step 1: Register Your Domain and Obtain an API Key
- Log in to your CertPanel account.
- Add your domain inside the main dashboard by selecting Add Asset.
- Choose your Operating System (Windows, since we’re using Windows Server 2016).
- Select your preferred validation method (e.g., the HTTP file-based method or DNS method).

Once done, CertPanel will generate an API key for your server. Copy this key — it will be required during the agent installation process.
Step 2: Install the AutoInstall SSL Agent on IIS Windows Server 2016
- Download the Windows AutoInstall SSL Agent from CertPanel.
- Run the installer on your Windows Server 2016 machine.
- During setup, paste your API key when prompted.
The AutoInstall SSL agent will automatically:
- Generate a secure CSR for your domain.
- Submit the request and issue the SSL/TLS certificate via CertPanel.
- Install the SSL/TLS certificate into the Windows Certificate Store.
- Bind the certificate to the correct IIS site automatically.
- Configure automatic renewals, ensuring your site never goes offline due to an expired certificate.
Step 3: Verify SSL/TLS Certificate Installation on Your IIS Website
Once the AutoInstall Agent finishes, your site will be:
- Accessible via the secure HTTPS protocol.
- Automatically bound to the correct website domain or IP address.
- Set up for future automatic renewals (no manual updates required).
Common Questions About IIS Windows Server 2016 Certificate Installation
Can I use a wildcard SSL across multiple subdomains?
Yes, it covers all subdomains (e.g., mail.example.com, shop.example.com).
What if I have an existing certificate already installed?
If you already have a certificate installed for your site, you can delete or overwrite it by completing the new certificate request using the same friendly name. For example, you might do this when your old certificate is about to expire, and you’ve purchased or generated a new one — using the same friendly name ensures the new certificate cleanly replaces the existing one without causing conflicts.
Is MMC mandatory for installing or using an SSL/TLS certificate on IIS?
No, but it helps you manage trust chains and inspect certificate details easily.
What to Do if HTTPS Is Not Working After SSL Certificate Installation
- Check that port 443 is open in the firewall
- Make sure the certificate is correctly bound in IIS
- Ensure the CA bundle is trusted
Additional SSL/TLS Configuration Tips for Windows Server
- Firewall Rules: Ensure port 443 (HTTPS) is allowed in both Windows Firewall and any cloud provider’s security group so users can access your site securely.
- Security Hardening: Disable outdated SSL/TLS protocols such as SSL 2.0, SSL 3.0, TLS 1.0, and TLS 1.1. Only TLS 1.2 and TLS 1.3 are recommended. For more details, see Microsoft’s official TLS guidance.
- Monitoring: Use CertPanel’s SSL Monitor to track certificate expiry and detect 110+ SSL/TLS-related vulnerabilities in real time.
- Wildcard SSL Tip: Remember that a wildcard certificate secures all subdomains (e.g., .example.com) but does not automatically cover the root/apex domain (example.com). Be sure to include the root separately if you want it secured.