Why Automatic SSL Installation Is a Game-Changer
Setting up SSL manually on Ubuntu can feel like a whirlwinds of seemingly endless tasks:
- generating CSRs,
- validating your domain,
- downloading certificate files,
- uploading certificate files to your server,
- editing NGINX configs, and
- reloading services.
While manual methods give you full control, they also leave plenty of room for error.
That’s why automatic SSL installation is quickly becoming the industry standard. Using an automated solution:
- saves time,
- frees you up to focus on other tasks and priorities,
- reduces manual misconfiguration-related risks, and
- ensures your website is secured with HTTPS quickly.
👉 If you still prefer manual installation, check out our detailed guide: How to Install SSL Certificate on NGINX in Ubuntu (Manual / Automated).
Step-by-Step Guide: How to Automatically Install SSL on Ubuntu NGINX
Step 1: Prepare Your Ubuntu Server
Before you start, ensure your Ubuntu server is running and NGINX is installed.
Check if NGINX is active:
sudo systemctl status nginxIf not installed yet, run:
sudo apt update
sudo apt install nginx -y
Step 2: Choose Your SSL Certificate
You need an SSL/TLS certificate before you can enable HTTPS.
- If you already have one, make sure your files are ready.
- If not, you can get a publicly trusted SSL/TLS certificate through us.
CertPanel offers standard and wildcard SSL certificates — the latter is perfect if you want to secure multiple subdomains.
Step 3: Use an SSL/TLS Automation Agent
Most modern SSL setups use an automation agent to simplify installation. These agents relieve you of monotonous tasks like domain validation, installing certificates, and setting up renewals by doing it automatically.
CertPanel AutoInstall SSL (for Ubuntu + NGINX)
If you’re a CertPanel user, AutoInstall SSL makes this process seamless:
- Sign in to the CertPanel Dashboard.
- Go to your SSL/TLS certificate management page.
- Select AutoInstall SSL.
- Choose:
- Operating System: Ubuntu
- Web Server: NGINX

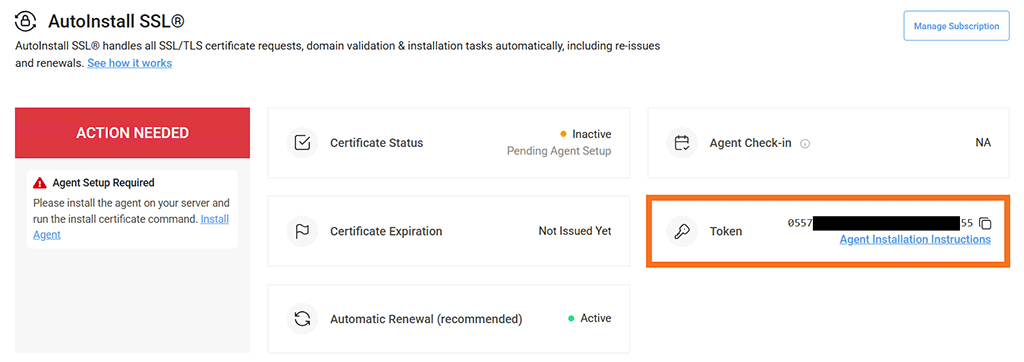
Step 4: Generate Your AutoInstall SSL API Key
Automation tools require authentication. In CertPanel, this happens via an AutoInstall SSL API Key.
- This API key ensures secure communication between your server and CertPanel.
- It allows AutoInstall SSL to configure DNS records (if needed), install certificates, and handle renewals.
In CertPanel:
- Under your existing CertPanel Orders page, click the Manage button to bring up your certificate order. Scroll down to the AutoInstall SSL section. There, you’ll find your AutoInstall SSL token (AutoInstall SSL API key).
- In your DNS provider’s dashboard, copy your access key and secret access key. (You’ll use both of these resources in the next step.)
- Now, switch over to your server’s terminal.
Related resource: Using DNS Validation with AutoInstall SSL
Step 5: Download and Run the AutoInstall Script
From CertPanel, copy the generated installation command and run it in your terminal:
sudo wget -qO - https://files.autoinstallssl.com/packages/linux/version/latest/get.autoinstallssl.sh | sudo bash -sThe script will ask for your DNS provider’s API access key and secret access key. Once provided, it will:
- Validate your domain
- Install the SSL certificate in NGINX
- Reload your server configuration
Step 6: Verify Installation
After installation, restart NGINX using the following command:
sudo systemctl restart nginxNow visit the secure version of your site by adding https:// to the beginning of the URL (e.g., https://yourdomain.com). You should see a padlock in the browser’s web address bar.
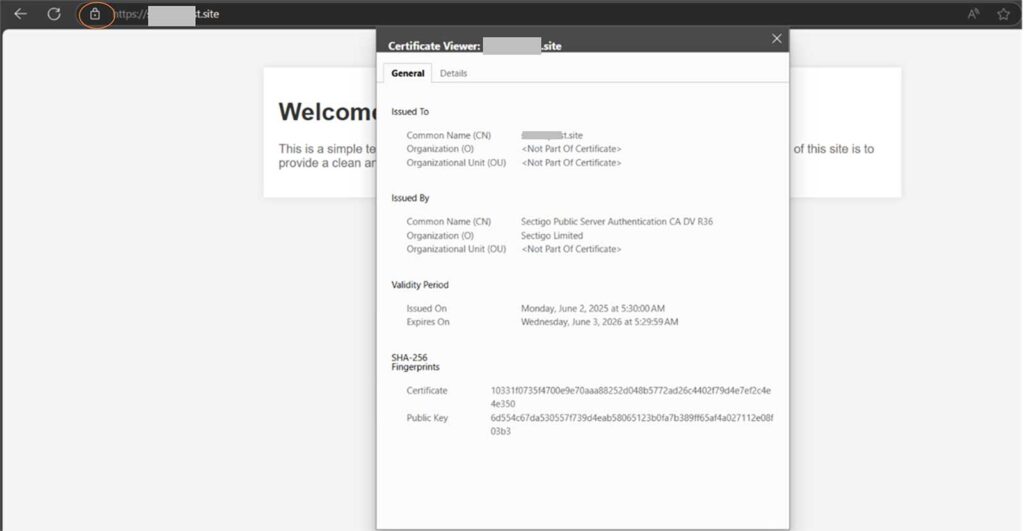
That’s it! Barring no issues or misconfigurations, your site should be good to go. AutoInstall SSL will handle your SSL/TLS certificate renewal and installation processes automatically in the future.
FAQs About Automating SSL on Ubuntu NGINX
Q1: Do I need root access for AutoInstall SSL?
Yes. Root (or sudo) access privileges are required to configure NGINX and update DNS settings.
Q2: What if my DNS provider isn’t supported?
CertPanel supports most major providers. If yours isn’t listed, you can:
- Complete the domain validation process manually by adding records in your DNS provider’s panel.
- Reach out to CertPanel Support via the dashboard to request support for additional DNS providers.
Q3: Does AutoInstall SSL handle renewals?
Yes. Certificates are renewed automatically before expiry, so your site always stays secure.
Q4: Can I use AutoInstall SSL with a wildcard SSL certificate?
Absolutely. Wildcard SSL certificates are fully supported, securing unlimited (single-level) subdomains with one certificate.