As a website owner, using HTTPS is essential to securing user data, improving SEO, and gaining visitor trust. In this guide, you’ll learn how to manually install and configure an SSL certificate on Debian and how to automate the process using CertPanel AutoInstall SSL.
The manual path suits users who want full control over files and configuration, while automation offers a simple, beginner-friendly option for users who want to set their server certificate installation tasks on autopilot.
Start by Getting an SSL Certificate
You’ll need a valid SSL/TLS certificate before starting. You can choose from a range of DV, OV, EV, multi-domain, and wildcard certificates from publicly trusted certificate authorities (CAs) (e.g., Comodo CA).
How to Manually Install an SSL Certificate on Apache2 (Debian)
Step 1: Generate a Private Key and CSR
Begin by generating a private key on your server, which will be used to create a certificate signing request (CSR):
sudo openssl genrsa -out /etc/ssl/private/example.com.key 2048Then, create the CSR:
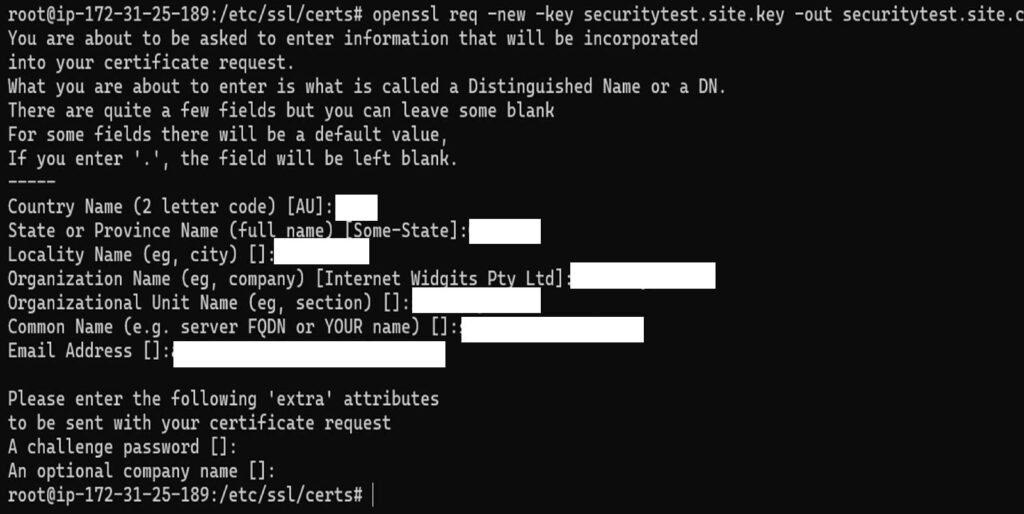
sudo openssl req -new -key /etc/ssl/private/example.com.key -out /etc/ssl/certs/example.com.csr This command will bring up a list of fields for you to complete regarding your domain and organization:
Submit the CSR to your chosen certificate provider. For this step, if you’ve purchased a certificate through our website, you can submit the CSR in CertPanel when enrolling for your certificate. This can be done by navigating to All Orders > Get Started > Submit CSR in the CertPanel dashboard.

Step 2: Validate Your Domain
CertPanel offers several methods of domain control validation (DCV), including HTTPS-based validation, which is fast and easy to use.

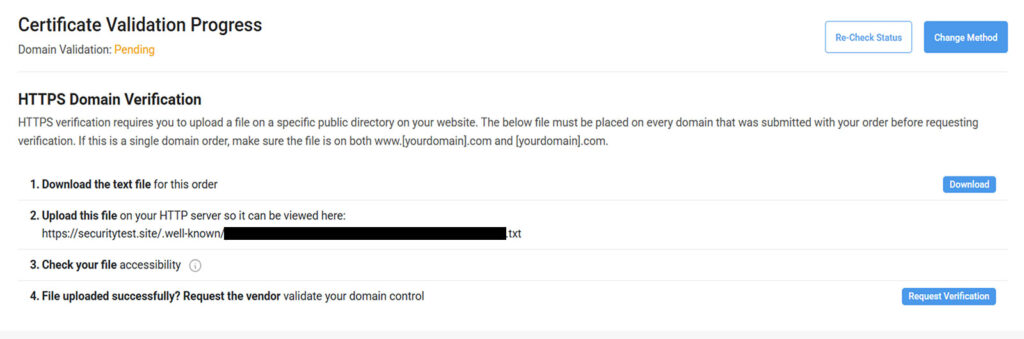
After initiating domain validation, you’ll receive a .txt file from the certificate provider. In CertPanel, you’ll find this information in the Certificate Validation section after completing the certificate enrollment process.
Upload the file to this directory:
/var/www/html/.well-known/pki-validation/If this directory doesn’t exist, you can create it using the following commands:
sudo mkdir -p /var/www/html/.well-known/pki-validation/
sudo nano /var/www/html/.well-known/pki-validation/filename.txt
Paste in the contents, save, then enable SSL and restart Apache:
sudo a2enmod ssl
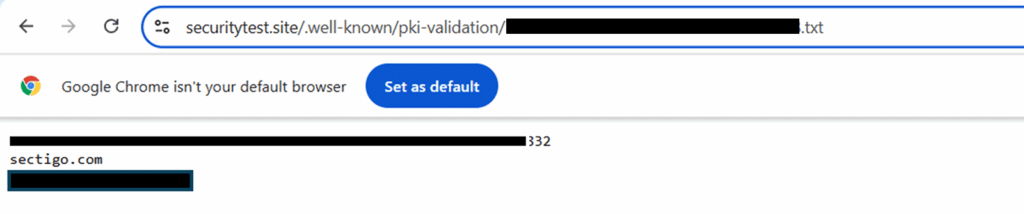
sudo systemctl restart apache2 Once this step is complete, you’ll want to visit the validation URL in your browser to confirm the changes have taken effect. If you see a message like the following (below), go back to your CertPanel screen and click Request Verification.
Step 3: Download, Upload, and Organize Your Certificate Files
After validation, download the issued certificate files from your certificate provider. (Again, if you’ve bought one of our certificates, you can do this in CertPanel.) You’ll receive the following in a .zip file:
- example.com.crt
- My_CA_Bundle.ca-bundle
Use the secure copy protocol (SCP) to upload these files to your Debian server. (Swap out our generic placeholder info with your specific file names in the following command.):
scp -i your-key.pem example.com.crt ca_bundle.ca-bundle user@server_ip:/home/userThen, move them to Apache’s certificates folder:
sudo mv /home/user/example.com.crt /etc/ssl/certs/
sudo mv /home/user/ca_bundle.ca-bundle /etc/ssl/certs/
Note: Apache, unlike NGINX, conveniently doesn’t require you to create a combined chain certificate file.
Verify your permission settings to ensure the files are secure and readable by Apache:
sudo chmod 644 /etc/ssl/certs/example.com.crt /etc/ssl/certs/My_CA_Bundle.ca-bundleStep 4: Enable Apache’s SSL Module and Configure Your HTTPS Virtual Host (Debian/Ubuntu)
To enable required modules (and reload Apache), use the following command:
sudo a2enmod ssl
sudo a2enmod headers     # recommended for HSTS and security headers
# optional but common if you use redirects/rules:
sudo a2enmod rewrite
sudo systemctl reload apache2- If a module is already enabled, Apache will say so.
- Enabling ssl also ensures Apache listens on port 443 (via ports.conf).
Edit your site’s existing SSL configuration file:
sudo nano /etc/apache2/sites-available/default-ssl.confOr, better still, create a new config file that’s specific to your domain using the second command:
sudo nano /etc/apach2/sites-available/example.com.confIf editing the existing file, confirm these lines are in place in the VirtualHost block:
SSLCertificateFile /etc/ssl/certs/example.com.crt
SSLCertificateKeyFile /etc/ssl/private/example.com.key
SSLCertificateChainFile /etc/ssl/certs/My_CA_Bundle.ca-bundle
If you’re creating a new config file, ensure you include the following configuration block:
<VirtualHost *:443>
ServerAdmin admin@yourdomain.com
ServerName yourdomain.com
DocumentRoot /var/www/html
SSLEngine on
SSLCertificateFile /etc/ssl/certs/yourdomain.crt SSLCertificateKeyFile /etc/ssl/private/yourdomain.key SSLCertificateChainFile /etc/ssl/certs/your_ca_bundle.ca-bundle
<Directory /var/www/html>
Options Indexes FollowSymLinks
AllowOverride All
Require all granted
</Directory>
ErrorLog ${APACHE_LOG_DIR}/error.log
CustomLog ${APACHE_LOG_DIR}/access.log
combined
</VirtualHost>Enable the site’s updated SSL configuration file and restart your Apache server to ensure it takes effect:
sudo a2ensite default-ssl
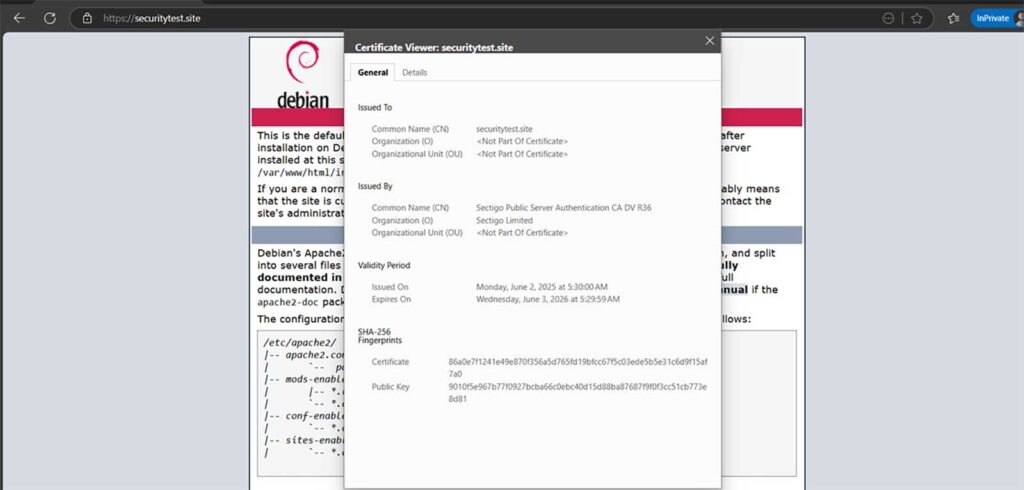
sudo systemctl reload apache2Now, go to https://example.com to verify whether SSL/TLS is working:
How to Install SSL Automatically on Debian (Apache2)
Step 1: Get AutoInstall SSL
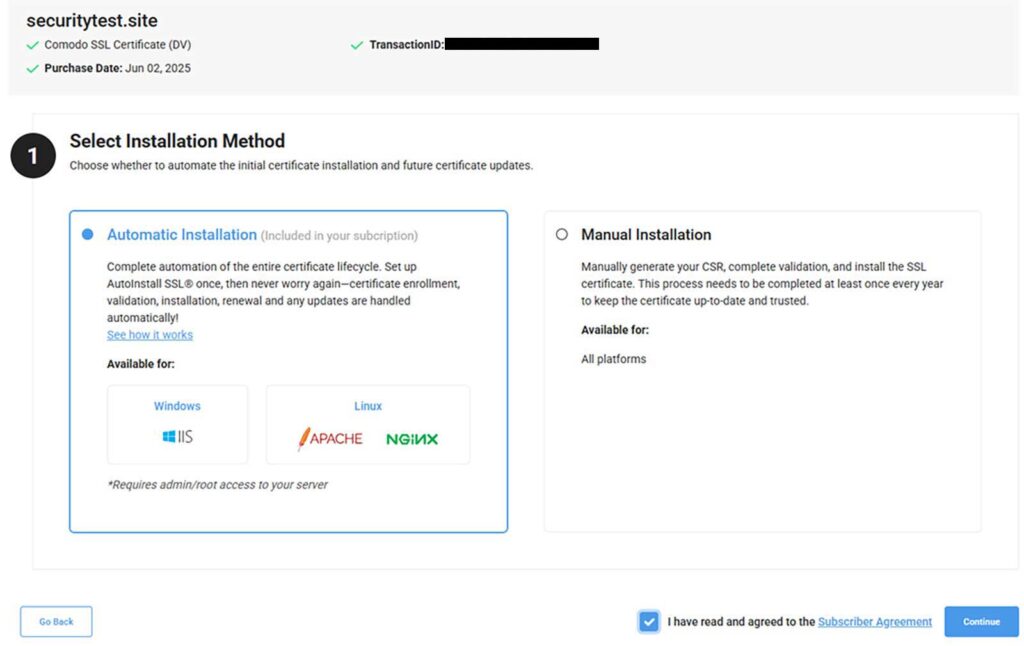
Before you can use CertPanel AutoInstall SSL, you must first select Automatic Installation during the certificate enrollment process. (This will require agreeing to the Subscriber Agreement terms and conditions.)
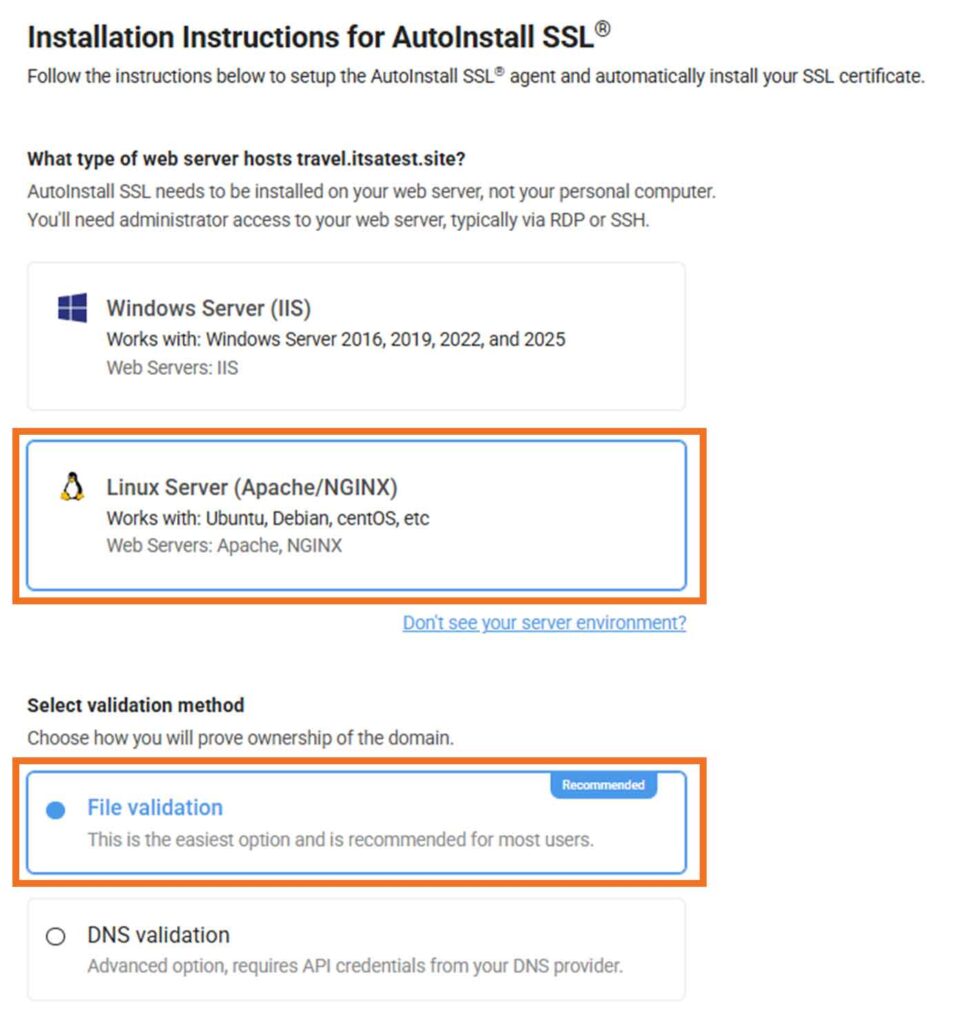
Step 2: Specify Your Server to Install the AutoInstall SSL Agent
This part of the wizard requires you to select Linux Server (Apache/NGINX) from the web server list of options and complete the certificate validation process:
Step 3: Run the AutoInstall SSL Installer
Use the following command to download and launch the installer:
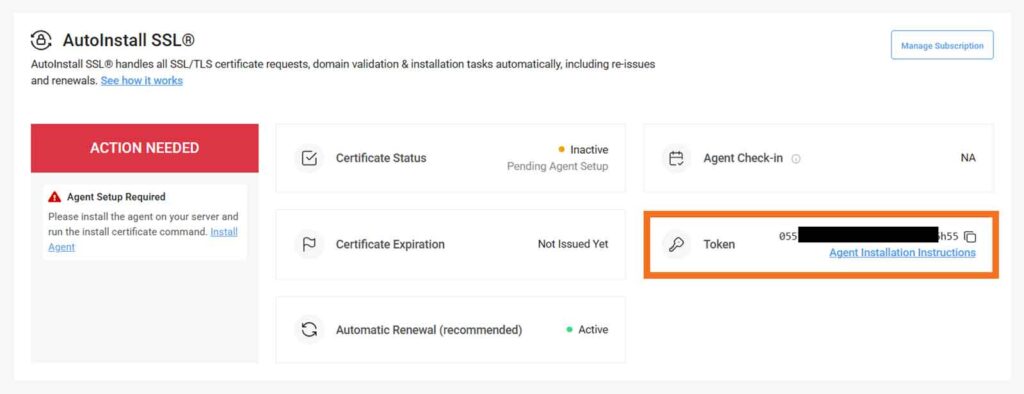
sudo wget -qO - https://sb.files.autoinstallssl.com/packages/linux/version/latest/get.autoinstallssl.sh | sudo bash –s For this next step, you’ll need to grab the AutoInstall SSL token from CertPanel. You’ll find the token info listed on the Manage Order — Enroll Now page in the AutoInstall section:
Launch the agent using your token:
sudo runautoinstallssl.sh installcertificate --token <your_token> --validationtype file --validationprovider filesystem Once this process is complete, the automation agent will handle the full certificate generation and installation process for you:
- CSR generation,
- Domain validation,
- Certificate installation,
- Apache2 configuration updates, and
- Server reload.
Step 4: Test to Ensure Everything Works as Intended
Visit your domain over HTTPS in a browser to ensure your site loads without security issues and warnings.
Use CertPanel’s SSL Monitor to get alerts for certificate expiry and 100+ vulnerabilities.
Why Automate SSL Setup?
| Manual Certificate Installation | CertPanel AutoInstall SSL | |
| Time to Complete | 20–30 minutes | 2 minutes |
| Error Risk | Moderate | Low |
| Renewals | Manual | Built in automation |
| Skill Required | Intermediate | Beginner friendly |
Common Questions (for Debian Apache2 Users)
Can I replace my existing SSL certificate with a new one?
Yes. Simply upload the new certificate, key, and CA bundle, then edit your Apache config to point to the new files and reload Apache. It’s a good idea to do this 1–2 weeks before expiry.
Is fullchain.pem needed for Apache2?
Not necessarily — it depends on which version of Apache you’re using. If you’re using an older version of Apache (i.e., versions predating Apache 2.4.8) just use the .crt and .ca-bundle files. Apache2 reads them separately via the SSLCertificateFile and SSLCertificateChainFile commands.
If you’re using Apache 2.4.8 or later, then using the fullchain.pem file is recommended.
How do I test if my Apache2 SSL config is valid?
Run the following command:
sudo apachectl configtest You should see Syntax OK. If you see this, go ahead and reload your server:
sudo systemctl reload apache2 If you encounter errors (e.g., missing or incorrect file paths, invalid directives, etc.), Apache will typically show the line and file in question. To check your logs:
sudo journalctl -xe
sudo tail -f /var/log/apache2/error.log
How do I renew an SSL certificate?
Purchase or reissue a new certificate, then repeat the installation steps we covered earlier. AutoInstall SSL users don’t need to worry — renewals are handled automatically.
What do I do if HTTPS still isn’t working?
- Double-check paths in your Apache config
- Ensure your certificate and chain are correctly formatted
- Make sure the server time is accurate