Easily secure your website on NGINX (Ubuntu) with an SSL (TLS) certificate. Follow our beginner-friendly step-by-step guide to installing HTTPS using OpenSSL or CertPanel’s AutoInstall SSL feature.
If you’re running a website on an NGINX server using the Ubuntu distro, enabling HTTPS is critical for both security and SEO. (HTTPS is viewed by Google Search as a positive page experience factor.) In this step-by-step guide, we’ll show you two methods to install an SSL certificate on NGINX Ubuntu:
- The manual method of using OpenSSL and a Comodo SSL/TLS certificate, and
- Using CertPanel’s AutoInstall SSL automation agent.
Whether you’re setting up a new site or securing an existing one, this article will walk you through the process step-by-step.
Prerequisite: You Must Have an SSL Certificate
To install SSL on your Ubuntu server, you’ll need a valid SSL certificate. We recommend choosing a Comodo SSL Certificate for trusted encryption, compatibility, and flexible options to suit different needs. (You can purchase an SSL/TLS certificate easily through your CertPanel user account dashboard.)
Manual Method: A Step-By-Step Guide to Installing SSL on NGINX
This section will show you how to install and configure an SSL/TLS certificate manually on your NGINX server.
Step 1: Generate & Submit a Certificate Signing Request (CSR)
Before you can install an SSL certificate on NGINX, you’ll first need to generate a CSR. To do this on your Ubuntu server using OpenSSL, use a customized version of the following command:
openssl req -new -newkey rsa:2048 -nodes -keyout <your_domain.tld>.key -out <your_domain.tld>.csr Replace the generic key and CSR file names with your domain and key information:
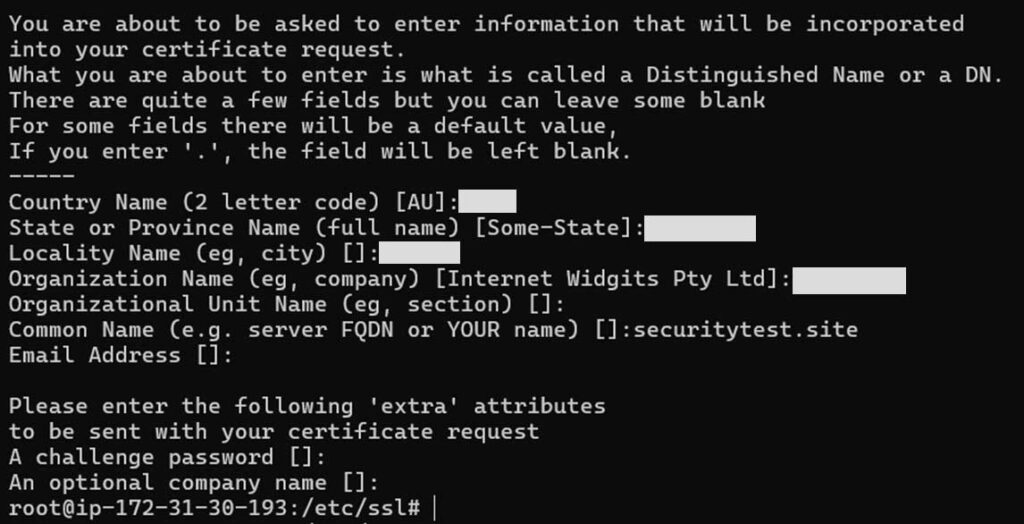
This will generate your CSR, which is a long string of base-64 characters that looks similar to this redacted example:
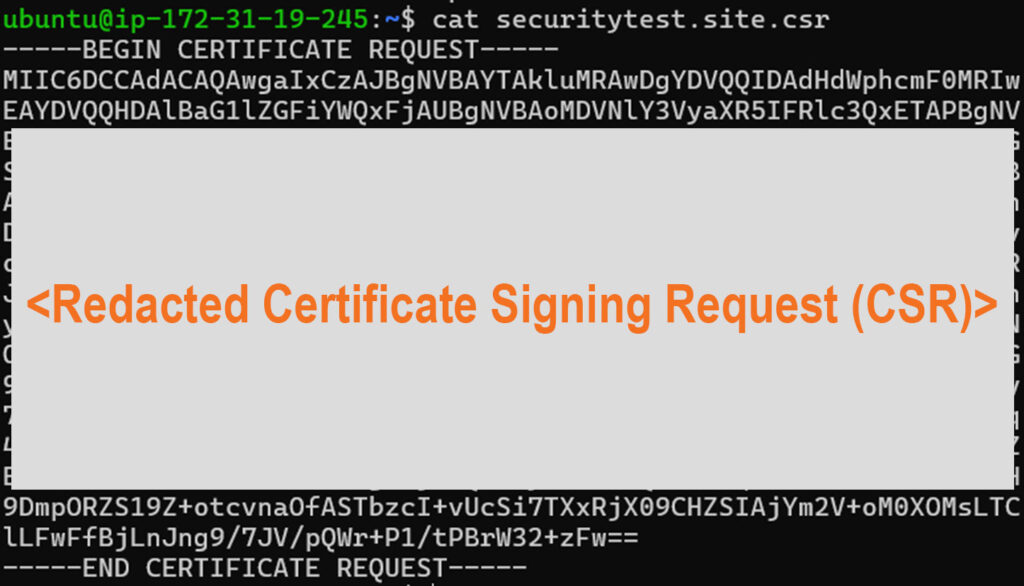
To complete the certificate request process:
- Go to the CertPanel Dashboard, navigate to All Orders, and locate your certificate order.
- Click the Get Started button in the Order ID row.
- In the CSR submission field, paste the entire content of your CSR file as is — including the header and footer lines:
-----BEGIN CERTIFICATE REQUEST-----

[your encoded CSR content]

-----END CERTIFICATE REQUEST------ Remove any extra spaces or missing lines.
Step 2: Complete the Validation Process
Complete domain validation using any of the methods listed below. We’ll use HTTP file-based validation for this example. (This method is recommended for all domain validations with the exception of wildcard SSL certificates, which can’t use file-based validation.)

Download the specified text file from the CertPanel dashboard. You’ll upload it to the server at the specified file path. For example: /var/www/html/.well-known/pki-validation/<provided_by_your_certificate_provider>.txt

Here’s a quick example of how this will look:

We need to provide the following read, write, and execute (755) permissions and read and write (644) permissions to the files:
sudo chmod 755 /var/www/html/.well-known
sudo chmod 755 /var/www/html/.well-known/pki-validation
sudo chmod 644 /var/www/html/.well-known/pki-validation/<ca_example_file>.txt
Check if the test file is accessible at https://<your_domain>/.well-known/pki-validation/ <validation_filename>.txt, as shown in the example below:

Click Request Verification. Wait for five minutes and then select Re-check Status. Do you still see the message stating that the “certificate is pending validation”? Then check out our troubleshooting guide.
NOTE: You’ll be required to provide additional validation-related information for organization validation (OV) and extended validation (EV) certificates.
Step 3: Download and Install the SSL/TLS Certificate on NGINX Ubuntu
Once the CA has successfully validated your domain (and any other relevant organization information for higher-validation certificates), it issues the SSL certificate. You can download the ZIP file for your certificate from the CertPanel dashboard, as shown below:
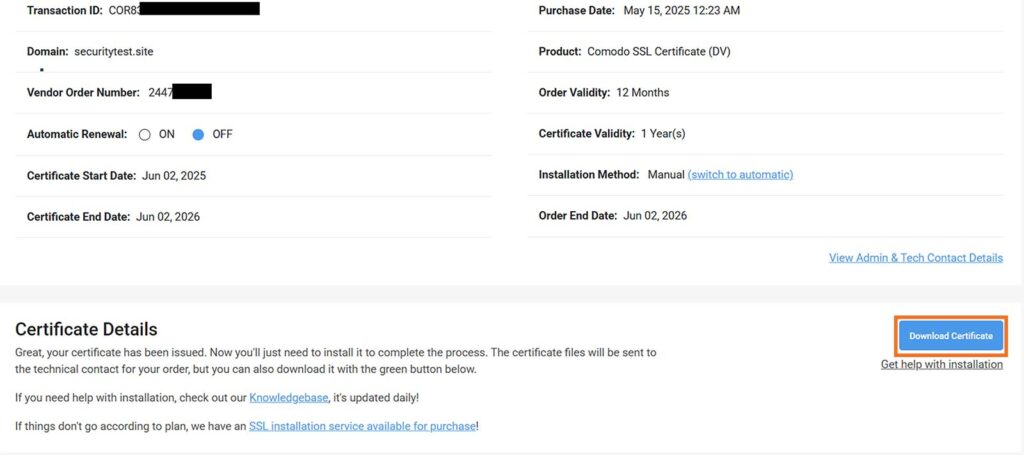
Unzip the file folder, which will contain at least these two files:
- my_ca_bundle.ca-bundle (the intermediate certificate)
- <your_domain.tld>.crt (your domain’s certificate)
Upload Your Server Certificate and CA Bundle Files
Run scp to securely copy both files to your server. NOTE: Replace the placeholder certificate names and other info accordingly:
scp -i <secret_key_to_access> .\my_ca_bundle.ca-bundle .\<your_domain.tld>.crt <username>@<ip_address_to_access>:/home/<username> After uploading the certificates, use SSH to access your server and move the files to the correct location:
sudo mv /home/admin/my_ca_bundle.ca-bundle/home/admin/<your_domain.tld>.crt /etc/ssl/certs Create the Certificate Chain
Create a full certificate chain file for NGINX by combining your server certificate and CA bundle file:
cat /etc/ssl/certs/<your_domain.tld>.crt /etc/ssl/certs/my_ca_bundle.ca-bundle | sudo tee /etc/ssl/certs/fullchain.pem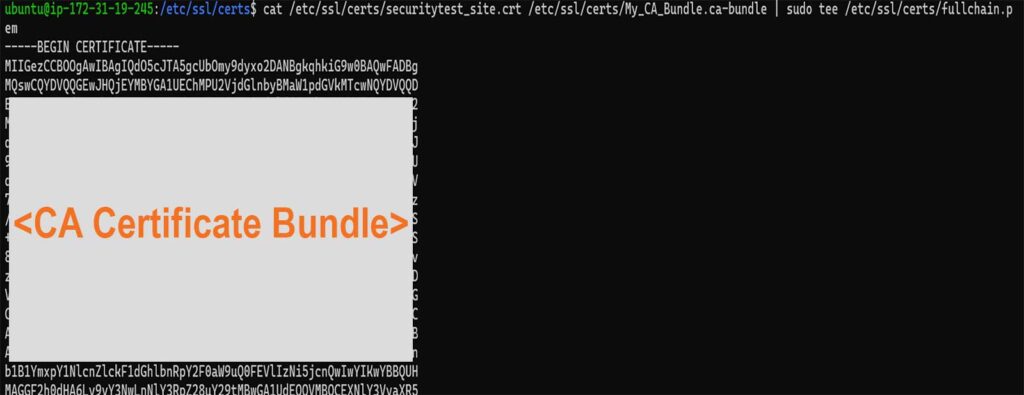
Configure your permissions using the following standard command. (Note the following permission values: 6 = read + write for the owner, 4 = read-only for group, and 4= specifies read-only for others):
sudo chmod 644 My_CA_Bundle.ca-bundle <your_domain.tld>.crt Step 4. Configure Your Permission Settings
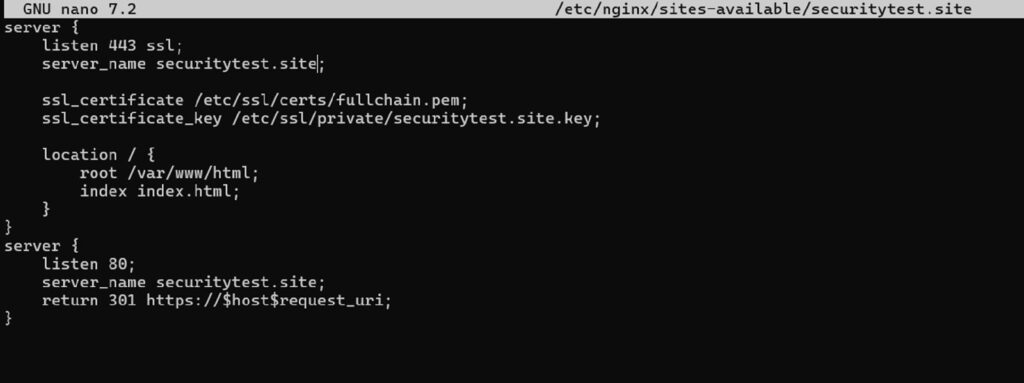
You can either modify the default NGINX configuration file or (recommended) create a new configuration file specifically for your domain:
sudo nano /etc/nginx/sites-available/defaultor (recommended)
sudo nano /etc/nginx/sites-available/<your_domain.tld>Follow your chosen file path with the following:
server {

    listen 443 ssl;

    server_name <your_domain.tld>;

    ssl_certificate /etc/ssl/certs/fullchain.pem;

    ssl_certificate_key /etc/ssl/private/<your_domain.tld>.key;

    location / {

        root /var/www/html;

        index index.html;

    }

}

server {

    listen 80;

    server_name <your_domain.tld>;

    return 301 https://$host$request_uri;

} 
To activate your site’s SSL configuration in NGINX, create a symbolic link from sites-available to sites-enabled:
sudo ln -s /etc/nginx/sites-available/securitytest.site /etc/nginx/sites-enabledStep 5. Test and Restart Your Server to Apply the Changes
Test your configuration changes to ensure they work:
sudo nginx -t Next, restart your NGINX server:
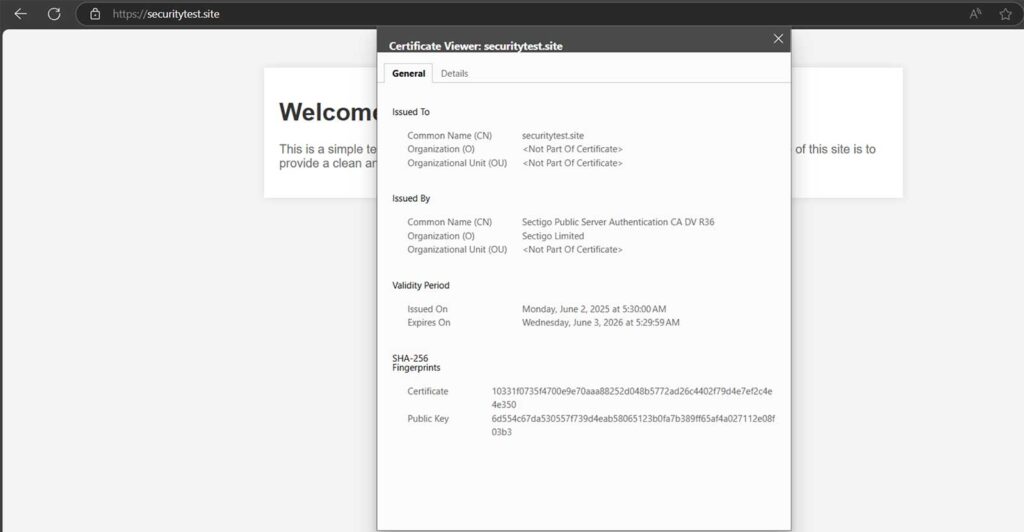
sudo systemctl reload nginx Visit your website with the secure https:// protocol (in this example, we’re using https://securitytest.site) to ensure the SSL certificate is active and valid.
Automatic Method: Use AutoInstall SSL to Add SSL to Your Server
If manually handling all of those tasks isn’t your preference (or doing so is infeasible because you have too many certificates to manage individually), then this next approach will be a better option. This involves the use of CertPanel’s AutoInstall SSL feature.
Step 1: Select Automation as Your Installation Method
Log in to your CertPanel account. In the dashboard, click on All Orders and select the Get Started button next to your certificate order number on the next page.
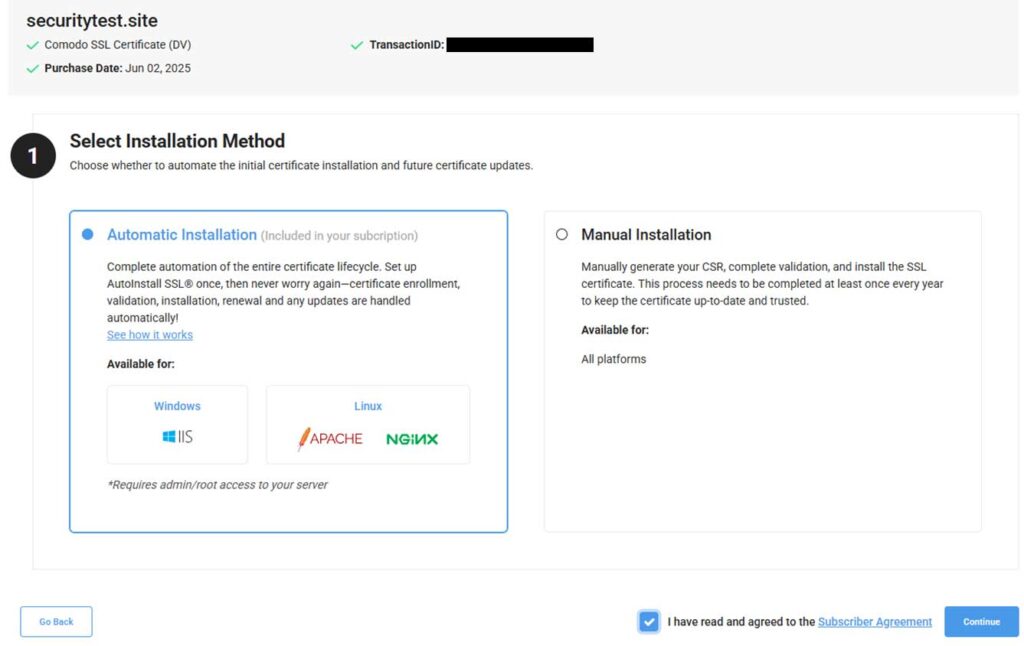
Press Complete Certificate Enrollment to begin the process. Select Automatic Installation in the Certificate Enrollment process to specify your choice of installation method:
Step 2: Specify Your Server Type
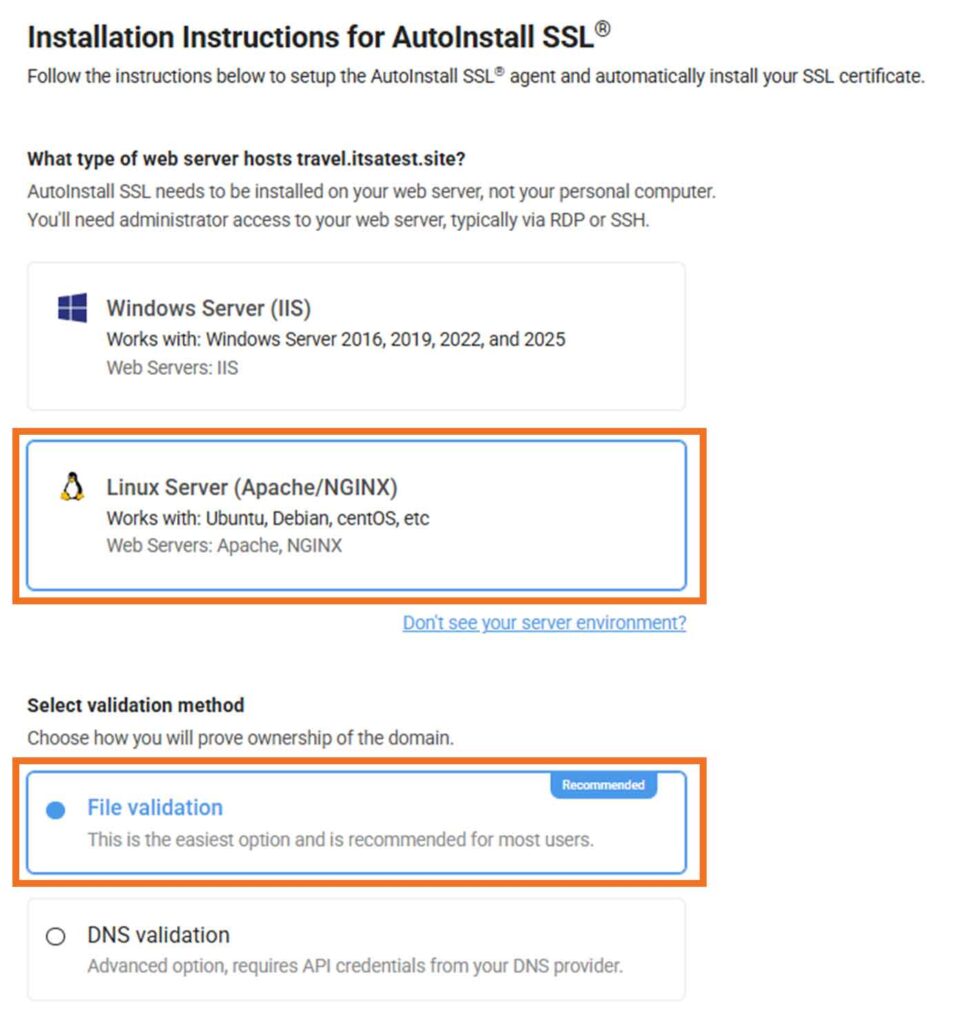
For the Installation Instructions on the next screen, select Linux Server (Apache/NGINX) as your web server and specify whether you want to use File validation or DNS validation.
Step 3: Install the Automation Agent & Your Certificate on NGINX
Install AutoInstall SSL on NGINX (Ubuntu)
SSH into your server and begin the installation process using the following command:
sudo wget -qO - https://sb.files.autoinstallssl.com/packages/linux/version/latest/get.autoinstallssl.sh | sudo bash -sInstall Your Server Certificate
Run the AutoInstall SSL agent to install your SSL/TLS certificate using the following command:
sudo runautoinstallssl.sh installcertificate --token <your unique token info> --<validationtype file.txt> --validationprovider filesystemRelated: Learn additional AutoInstall SSL Agent Commands using this handy guide.
Verify the SSL Agent Was Installed Successfully
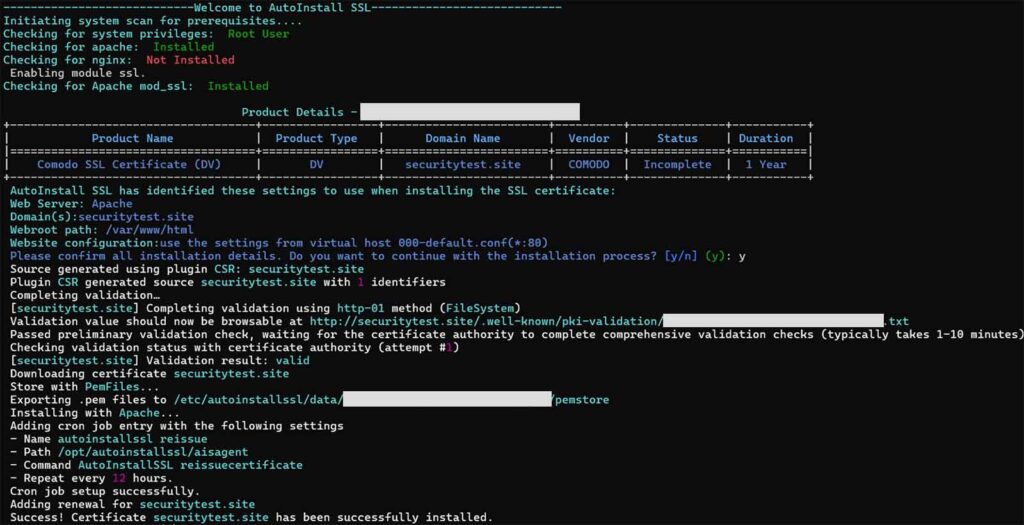
The AutoInstall SSL agent will automatically
- generate the CSR,
- initiate and complete domain validation (based on your selected method),
- retrieve the signed SSL certificate, and
- update your NGINX configuration with the appropriate certificate paths and settings.
Once the process is ready, simply press Enter to execute and finalize the installation.
Step 4: Test to Ensure the Changes Are Live on Your Site
Now the last process, simply visit https://<your_domain.tld> and verify it is using a secure, encrypted connection (HTTPS).

That’s it! Now, you’ve successfully set up AutoInstall SSL to automatically handle SSL/TLS certificate installations on your server for this domain.
Why Choose Automatic Installation Over Manual?
1. Stay Ahead of Short-Term Certificate Expirations
As major browsers and certificate authorities shift toward shorter certificate lifespans (e.g., 47-day validity), manually tracking renewals becomes a burden. Automation ensures your certificate is always up to date — avoiding unexpected security warnings or outages.
2. Frees Up Time So You Can Focus on Other Priorities
Automatic installation via CertPanel’s AutoInstall SSL agent handles the entire process — everything from CSR generation and domain validation to certificate deployment — within minutes.
3. No More Typos or Misconfigurations
Manual setups can be error-prone, especially when dealing with NGINX config files and certificate paths. AutoInstall SSL applies configurations with precision, saving you from hard-to-troubleshoot mistakes.
4. Never Worry About Renewal Deadlines Again
With auto-renewal enabled, CertPanel AutoIstall SSL makes sure your certificates stay valid — no need to set calendar reminders or face last-minute panic when an SSL expires.
5. Perfect for First Timers and Non-Techies
You don’t need to master OpenSSL commands or dig through NGINX settings. Just run one simple command to install the AutoInstall SSL agent, and it takes care of everything behind the scenes.
Common Questions
What if I already have an SSL certificate installed on NGINX Ubuntu — can I replace it with a new one?
Yes. Simply upload the new .crt, .key, and .ca-bundle files, replace the paths in your NGINX config, and reload the server. Make sure the filenames and permissions are updated correctly.
Do I need to restart NGINX every time I renew or update my SSL certificate?
Yes, after renewing or updating your certificate files, you must reload or restart NGINX Ubuntu to apply the changes:
sudo systemctl reload nginx What’s the difference between fullchain.pem and certificate.crt in NGINX?
The fullchain.pem combined file includes your domain certificate and the intermediate CA bundle. NGINX requires the full chain to establish trust, which is why we concatenate both files when creating fullchain.pem.
How can I verify if the SSL certificate is installed correctly?
Use a browser to check for HTTPS and a valid certificate, or use tools like:
curl -Iv https://yourdomain.com Alternatively, try online SSL checkers like CertPanel’s SSL Monitor.
Is it safe to leave my private key on the server?
Yes, provided that it’s stored in /etc/ssl/private/ with 600 permissions (i.e., no ability to read, write, or execute) and is only accessible by root only. (Never share or expose your .key file.)
Will AutoInstall SSL overwrite my existing NGINX configuration?
No. AutoInstall SSL safely appends SSL-related directives. If it detects an existing SSL config, it will update only the relevant sections without affecting unrelated settings.
Can I run AutoInstall SSL in non-interactive mode (for scripts or automation)?
Yes, the agent supports non-interactive execution with flags like –token, –validationtype, and –validationprovider, making it ideal for CI/CD or provisioning pipelines.
Additional Tips
- Ensure your server’s time and date are correct to avoid certain SSL validation issues.
- Regularly check your SSL certificates’ expiration dates to avoid service interruptions.
- Consider using a strong Diffie-Hellman group server-level configuration setting for better security.
- Use a tool like CertPanel’s SSL Monitor feature to test your SSL configuration and identify potential vulnerabilities.